Event sourcing on blockchain with Ethereum, TypeScript and React
The concept of blockchain has evolved rapidly way beyond just Bitcoin. We are observing a rapid increase of interest in alternative types of cryptocurrencies and technologies based on the idea of a distributed ledger. This post assumes basic knowledge of how blockchain works. If you need a quick recap, here are some links:
- The Essence of How Bitcoin Works (Non-Technical), 5 min. video
- How Bitcoin Works in 5 Minutes (Technical)
Ethereum takes these concepts to a new level. While Bitcoin is a distributed ledger where all users agree on cryptocurrency transfers, Ethereum is a distributed ledger where all users agree on code execution and data updates. A distributed application is a piece of code uploaded to the blockchain, and sending transactions is equivalent to executing some public functions exposed by this code. Miners in the Bitcoin network process "coin transfer" transactions, while miners in the Ethereum network process "function call" transactions. Such function calls can modify application state which is data stored and shared in the ledger. Such apps are called Smart Contracts or dapps (decentralized apps). Each code execution needs to be paid by the caller, with dedicated currency called gas. Since each transaction is associated with an Ethereum account, required gas is calculated by converting the ETH cryptocurrency, which can be mined or just bought on exchange markets. The paid gas goes as a reward to miners, who actually perform the code execution and distributed data updates. It also serves as a protection against badly designed or malicious code which would run large loops, do a lot of data changes, etc. By focusing on writing your app in such a way that it consumes as little gas as possible, you make it more efficient, trustworthy and reliable.
The allegedly revolutionary feature here is that there is no Single Point Of Truth/Failure. There's no longer any "server" running "a backend app" that needs to be well secured against tampering. Also, there is no server/cluster which can fail and make the dapp unavailable. The decentralized consensus of tens of thousands distributed network participants is secure and reliable by design. No one can modify data without the global agreement. That's why Ethereum is often perceived as such a paradigm-shifting technology. I you need to dig deeper into the internals, check this detailed article: What is Ethereum? A Step-by-Step Beginner's Guide.
Since there is a lot of controversy around recent rapid fluctuations of ETH prices, a question arises: how mature and effective is Ethereum? Is it really technically promising? Some of its advocates claim it's "The new Internet", and it's hard to ignore how attractive it became among investors. The best way to explore this is to build an actual dapp, so let's do this!
Architecture of a dapp
A dapp consists of two main parts: the contract, running in the Ethereum network, and the client. Here's an example, with mentioned parts colored in purple: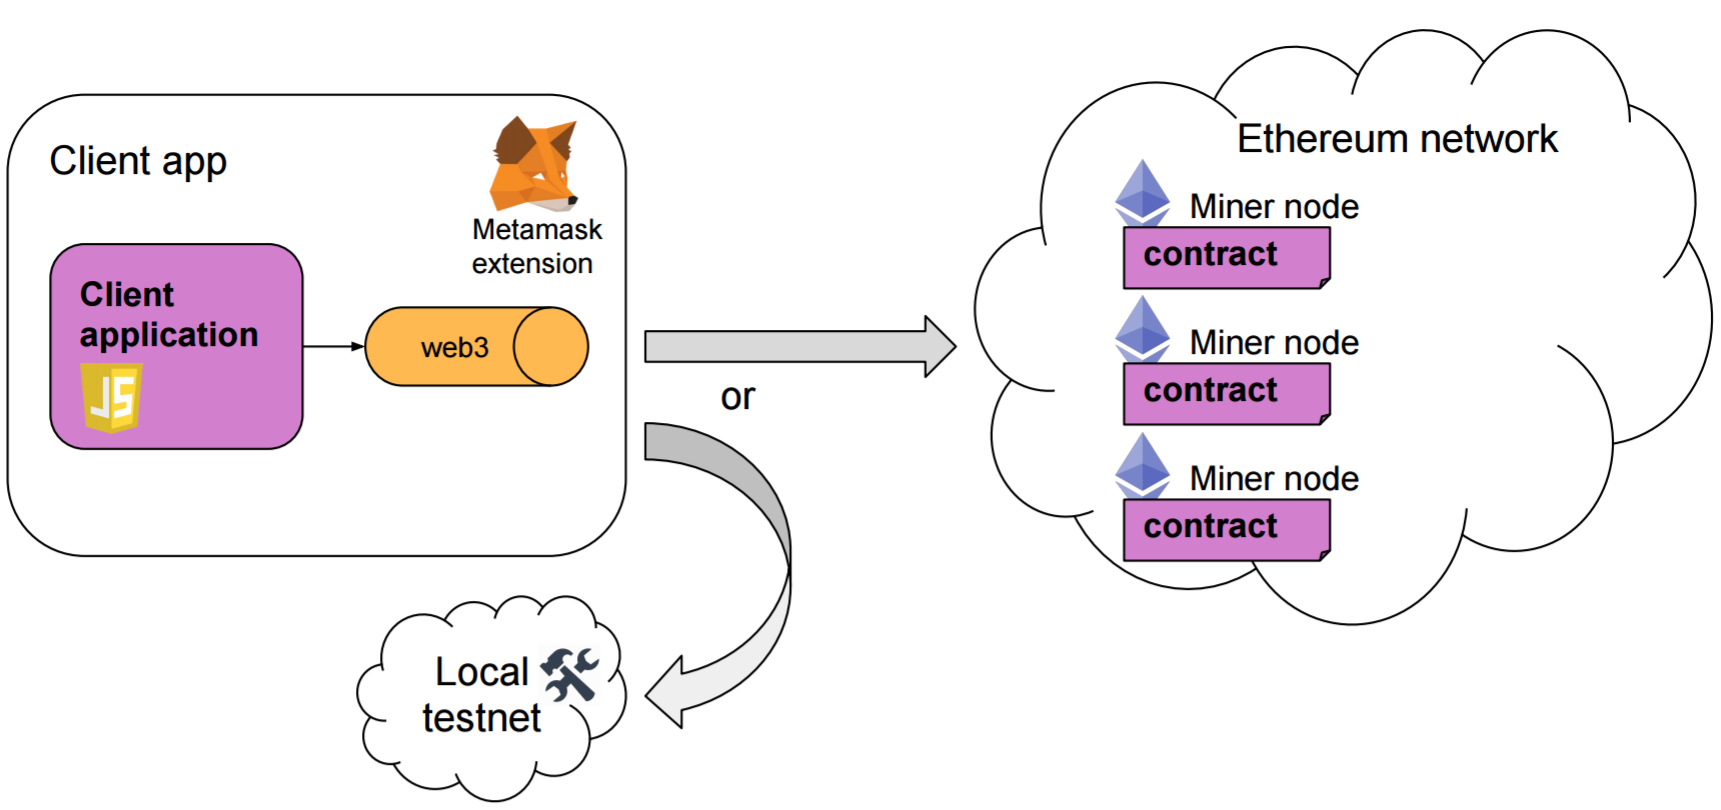
The contract
There are important differences when it comes to designing a smart contract, especially:
- The code is open source, but there's also "open runtime". This means that all communication between clients and the contract is visible to network participants, who are involved in executing these calls. Such fundamental principle requires different approach to design, where all sensitive data or authentication measures have to be properly handled using encryption and built-in methods, such as Ethereum accounts and private keys, for example some operations can be restricted to contract owner. I kept reminding myself "wait, this can't work like that, anyone can see this".
- Storage is very expensive. This stands in a strong contrast with what backend developers are used to. In typical modern approach, the "storage is cheap" slogan is
ubiquitous. We often save and query hundreds of gigabytes of data without too much fuss. Storing on blockchain has a significant gas price, so contract design needs a lot of low-level considerations of what is stored and what types should be used.
With that in mind, a contract can be written using the Solidity language and then deployed to the blockchain. Miners run their EVMs (Ethereum Virtual Machines) and handle contract API calls. Such calls can be done using various client libraries.
The client app
In our example the client is a web application running in the browser. In order to call Ethereum network API, we need the web3.js library and connection to a Ethereum network node. We may run nodes ourselves or connect to existing one via bridge/proxy e.g. using Metamask. It’s a browser plugin, which serves as a bridge for connecting to the network and injecting web3 instance to our code. Metamask also allows selecting different networks (like a local one for testing) and Ethereum accounts. There's also Mist Browser - another way to browse and run JS-based dapps, one can also bundle the whole app using Meteor and release it as a standalone package. The client app is just a set of static resources which can be run locally, or be exposed on a web server like Apache. In our case, the JavaScript code is hosted on S3, the original sources are written using TypeScript and React.
Decentralized Scheduling
Our showcase application will be a dead simple collaborative scheduling tool, similar to Doodle. It allows creating a new event with a list of options for voting, as well as casting votes in a secure way. You may be wondering what is the difference between this app and the example Voting dapp from the official Solidity tutorial. The most important difference is that here we don’t require any admin user to define users authorized for voting. Authorization is done using key string passed through URL. This means that the UX stays as smooth as in case of many other applications where passing a "editor URL" suffices for security. How can this be done when all contract code execution is open and visible? We will use some smart cryptographic functions to achieve this. But let's not jump too far ahead. Here's a list of all the features available in our simplified scheduling app:
- User can create an event with a list of options for selection.
- User can share event's unique generated URL with others
- Users can open the url and see a list of available options with their current score and all the vote
- Users can add or update their vote
Event sourcing
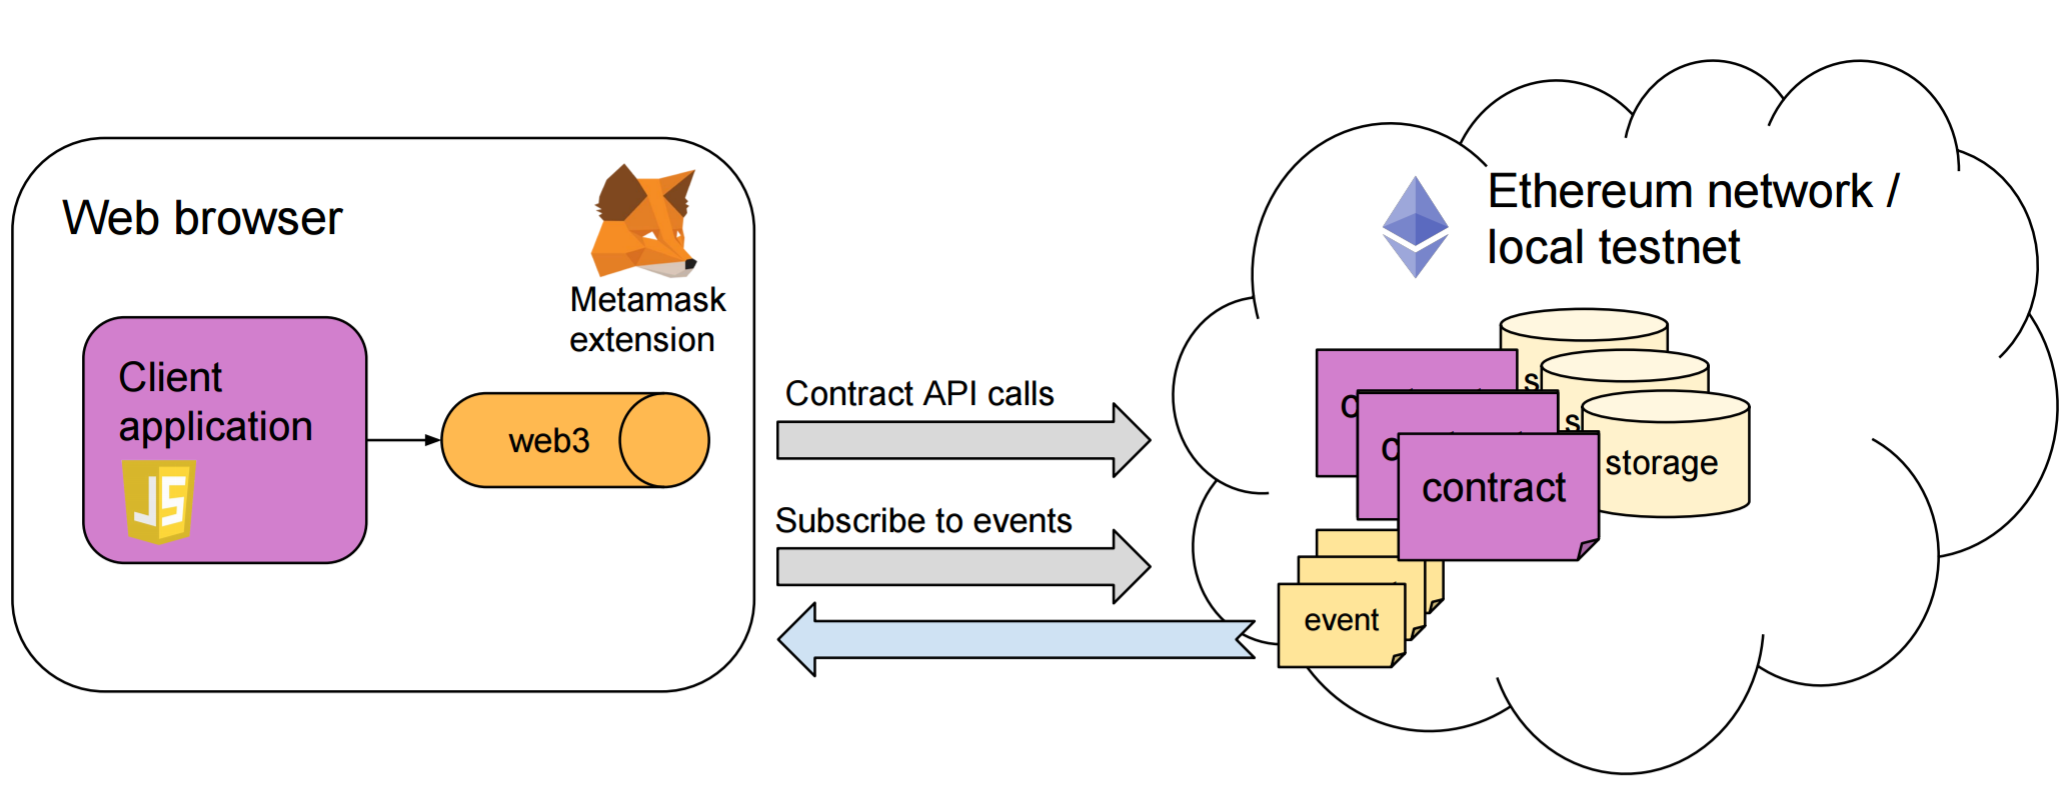
As I mentioned, storage is very expensive. However, there's another interesting feature that we can leverage: publishing events which seems to be many times cheaper. An event can carry some data and it remains stored in the blockchain forever. Then our client app can query all the relevant events and rebuild its internal state. When the events are used as the main source of truth about current state, it's called event sourcing. In our case, we will apply this concept partially. While writing events is super cheap in terms of gas, reading is a very slow operation, so basing only on events is out of the question. For the purpose of our example, we will use the events to build a list of all votes with voter names. However, we will also use contract storage to maintain the list of available voting options and current vote counts. Here's the final architecture:
Project setup
Let's start with taking a closer look at our tech stack:
- The contract is written using the Solidity language.
- Contract tests are written in JavaScript with Mocha and use testrpc to simulate the Ethereum network.
- Client part is written in TypeScript and React with styled-components.
- Frontend dependency management and build has been configured using npm and webpack.
- For contract building, testing and deployment we use Truffle framework.
- Also, don't forget Ethereum Stack Exchange where a vibrant community will help you when you're stuck.
As for the IDE, my tool of choice was Emacs with additional modes installed for Solidity and TypeScript. Additionally, there's Remix IDE which helps to debug the contract when running tests is not enough.
Full project sources are available on GitHub.
Writing the contract
Data
Our exploration begins straight with the smart contract. In our case it's a single file called DecentralizedSchedule.sol. First, there are some declarations of contract's internal fields and data types:
contract DecentralizedSchedule {

    // This is a type for a single proposal.
    struct Proposal {
        bytes32 name;
        int128 voteCount; // number of accumulated votes
    }

    struct UserVote {
        bool voted;
        uint proposalIndex;
    }

    struct Voting {
        string name;
        Proposal[] proposals;
        mapping(address => UserVote) votes;
    }

    // Key here is the unique address generated for each voting, called "signer"
    mapping(address => Voting) public votings;
As we can see, the Proposal type represents a single possible voting option with a name and number of votes already accumulated under this option. The bytes32 type is often used for storing short strings of constant length. The UserVote type represents a vote that has already been submitted, and the Voting type represents a single poll with its name, available proposals and a user->vote mapping. Each user here is identified by their address. Connecting to the Ethereum network requires you to have such an address, it's also where your ETH funds for executing dapps are stored. Finally, we keep a member variable votings, which represents a mapping between a signer and a poll, but this concept of a signer will be discussed a little bit later.
Remember that all this data is publicly readable, but can be altered only by calling contract's functions. For the purpose of our showcase app we don't care that the data can be read by anyone, as long as only authorized users can vote.
Constant functions
Some public functions of the contract can be marked as constant. This means that they don't modify data and can be executed without paying any gas. However, gas limit is still checked, which means that an infinite loop will not block, as "hypothetical gas" amount would run out. Here's one such function:
function voteCounts(address signer) constant returns (int128[]) {
    var ps = votings[signer].proposals;
    var arr = new int128[](ps.length);
    for (uint i = 0; i < ps.length; i++) {
        arr[i] = ps[i].voteCount;
    }
    return arr;
}
In a similar fashion, we can create a function for returning a list of all proposals:
function proposalNames(address signer) constant returns (bytes32[] names) {
    var ps = votings[signer].proposals;
    var arr = new bytes32[](ps.length);
    for (uint i = 0; i < ps.length; i++) {
        arr[i] = ps[i].name;
    }
    return arr;
}
Finally, we can combine these two and create a function for returning a poll summary:
function voteSummary(address signer) constant returns (string, bytes32[], int128[]) {
    return (votings[signer].name, proposalNames(signer), voteCounts(signer));
}
Executing public function can be performed as a call or transaction. When you call a function, the code will be executed and a return value will be provided, but any state updates or gas expenses will be dismissed right after the function ends. This may be useful for testing contracts or verifying gas cost before transactional calls. If your function is intentionally read-only, you may mark it as constant in order to mark that it should be used only with calls. That’s what we did with functions above. Unfortunately Solidity does not support returning structures, this is why we had to go all this way and build arrays, which are then returned in the final "array of arrays" by the voteSummary function.
Voting
Let's now see the voting function code:
function vote(string name, uint8 proposal, bytes32 prefixedSenderHash,
              bytes32 r, bytes32 s, uint8 v) returns (uint256) {
    // compare hashes -> this way no one can send votes as other users
    require(addressKeccak(msg.sender) == prefixedSenderHash);
    // derive signer from the signature
    var signer = ecrecover(prefixedSenderHash, v, r, s);
    var voting = votings[signer];
    require(!isEmpty(voting.name));
    require(proposal < voting.proposals.length);

    var prevVote = voting.votes[msg.sender];
    if (prevVote.voted) {
        voting.proposals[prevVote.proposalIndex].voteCount -= 1;
    }
    else {
        voting.votes[msg.sender].voted = true;
    }
    voting.votes[msg.sender].proposalIndex = proposal;
    voting.proposals[proposal].voteCount += 1;

    VoteSingle(msg.sender, signer, name, proposal);
}
This function is not constant, so it modifies local state. It’s meant to be called as a transaction, which costs gas (by the way, Metamask shows gas price + estimate USD price before running transactions, so a user can decide whether to proceed or cancel a call). As we can see, the function does some security checks and after that, it stores the user's vote or replaces the existing one. The last line:VoteSingle(msg.sender, signer, name, proposal); emits an event which will be later captured in the client app. The v, r, and s arguments represent digital signature of the caller. By leveraging hashing algorithms and signatures, we can use the built-in ecrecover function to ensure that function caller is an authenticated client. If you want to explore detailed steps of cryptographic tools used in our example, read the appendix.
Tests
The fastest way to test your contract is to write some tests with Mocha. First, make sure you are running testrpc. Then you can call truffle test. Here's a sample test which creates new poll and then calls voteSummary() to verify whether returned values match expected initial state:
contract('DecentralizedSchedule', function(accounts) {

  const sender = accounts[0];

  it("should initialize a new voting", function() {
    const signer = accounts[1];
    let meta;

    return DecentralizedSchedule.deployed().then((instance) => {
      meta = instance;
      return meta.create(signer, "SoftwareMill Birr June 2017", ['aa', 'bb']);
    }).then(() => {
        return meta.voteSummary.call(signer);
    }).then((voting) => {
          assert.equal(voting[0], "SoftwareMill Birr June 2017");
          assert.equal(web3.toUtf8(voting[1][0]), ['aa']);
          assert.equal(web3.toUtf8(voting[1][1]), ['bb']);
        });
  });
Writing the client code
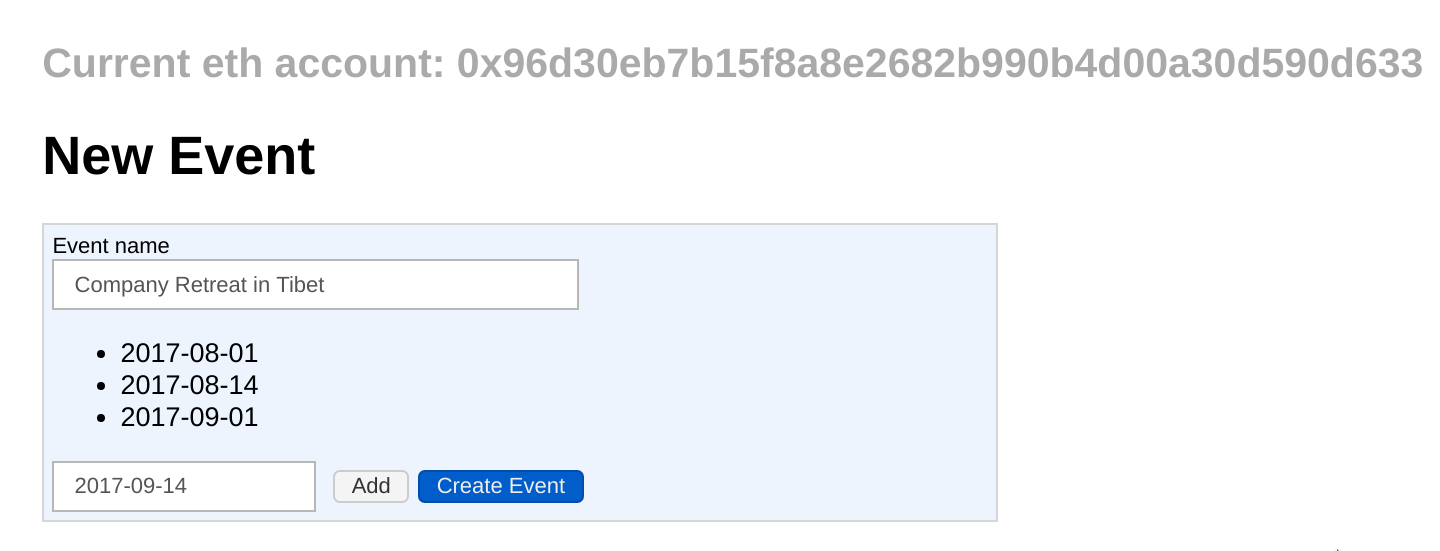
The frontend part consists of two main views: The "Create Event" view and the "Vote" view. The first one allows defining a poll with possible choices:
When the view is initialized, Metamask injects an instance of web3 which is used to connect to the contract:
import * as loadContract from 'truffle-contract'
const ethArtifacts = require('../../build/contracts/DecentralizedSchedule.json')

export default class CreateSchedule extends React.Component<{}, FormState> {
  // this object represents the contract interface
  contract: any

  constructor(props: any) {
    super(props)
    this.contract = loadContract(ethArtifacts)
  }

  componentDidMount() {
     Web3.initWeb3((accs: string[], initializedWeb3: any) => {
         this.web3 = initializedWeb3
         this.contract.setProvider(this.web3.currentProvider)
         this.setState({
             account: accs[0]
         })
     })
  }
}
This view simply allows defining event name and a list of options, and then clicking "Create Event". We do this in a child component:
const signer = ethjs.generate('892h@fsdf11ks8sk^2h8s8shfs.jk39hsoi@hohskd')
const ballotId: string = signer.address
const key: string = signer.privateKey

this.props.contract.deployed()
    .then(instance => instance.create(ballotId, this.state.name, this.state.options,
          { from: this.props.account, gas: 1334400 }))
    .then(r => {
        history.push('/vote?key=' + key + '&b=' + r.receipt.blockNumber)
    })
The above code uses the ethereumjs-util library to generate new signer account and call the contract's create() function to initialize new poll. Additionally, we use react-router to redirect to a new URL with two parameters:
- the private key allowing posting votes
- block number of the approved transaction. This will be used for event listeners as a starting index where on the blockchain we should start scanning for events
Let's now take a look at the voting view:
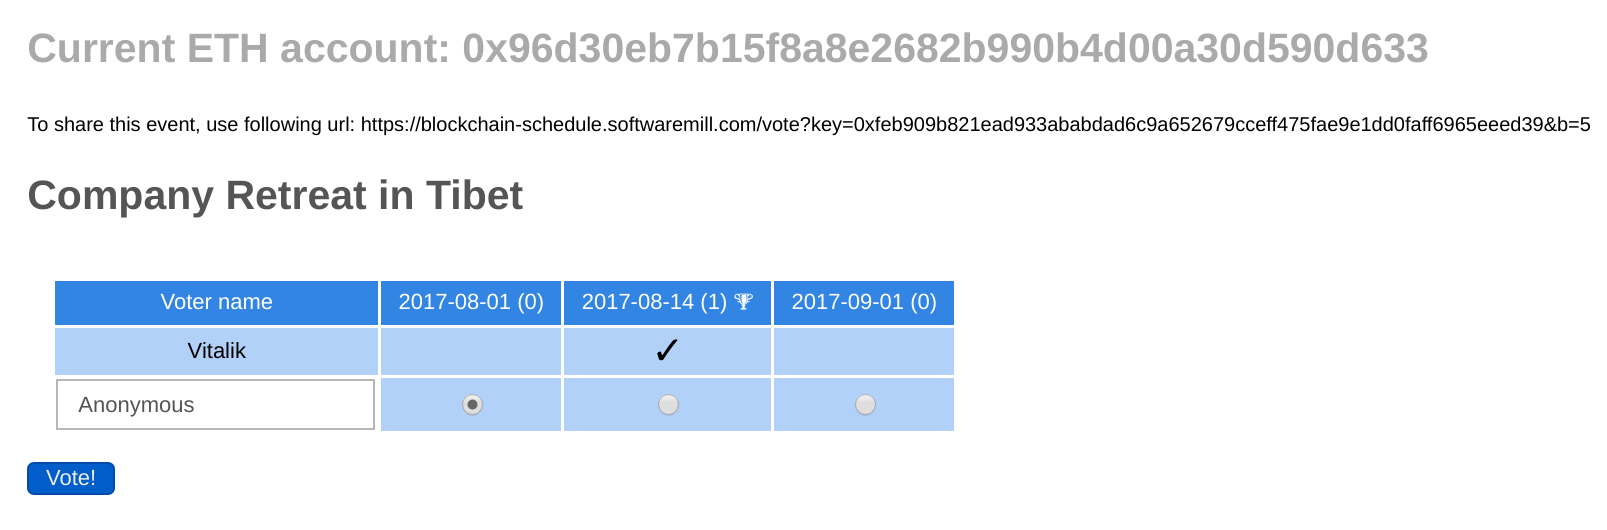
We can see all voting options with their vote counts. This data is retrieved in the component's constructor, using the voteSummary() contract function mentioned before:
loadedContract.voteSummary.call(this.id).then((response: any) => {
    const options: Array<VoteOption> = response[1].map((optHex: string, index: number) => {
        return {
            name: this.web3.toUtf8(optHex),
            voteCount: +response[2][index]
         }
     })
    this.setState({
        eventName: response[0],
        availableOptions: options
    })
})
Then, in componentDidMount() we start listening to events. Each event will update the component's state, which will cause re-rendering and updating the table with either new votes, or modifications.
const voteEvents = contract.VoteSingle({ signer: this.id },
    { fromBlock: this.creationBlock, toBlock: 'latest' })

voteEvents.watch((err: any, event: any) => {
    if (err) {
        console.log(err)
    }
    else {
        const newVote: VoteData = {
            name: event.args.voterName,
            index: event.args.proposal
        }
        this.setState({
            votes: { ...this.state.votes, [event.args.voter]: newVote }
        })
    }
})
Even though this is quite slow, we get poll results in the summary, so we can quickly see which option is the winning one.
Finally, pushing the "Vote" button does a transactional contract call:
castVote(event) {
    this.contract.deployed().then((instanc:e any) => {
        const sig = cryptoutils.signAddress(this.privKey, this.state.account)
        instance.vote(this.state.userName, this.state.userVote, sig.h, sig.r, sig.s, sig.v,
        { from: this.state.account, gas: 160000 })
            .then(() => this.loadSummary(instance))
    })
}
The cryptoutils call is an internal module which leverages ethereumjs-util to generate a signature of the sender's account id hash using the signer's private key. See Appendix for details on the cryptography behind this process.
The last thing worth mentioning is the gas argument passed to transactional calls. Without this number specified, the contract seemed to reject calls with 'out of gas' errors, caused by default limits. This way such limits can be skipped. There's probably a better way to handle this, so if you know any - I'd appreciate a comment with some hints.
Deployment
testrpc
Now that we have both the contract and the client code, we can start checking how it all runs together. First, ensure that testrpc is running. Then connect to this network with the Metamask extension in your web browser:
- Configure Metamask to use
localhost:8545as the endpoint - Check testrpc's output and copy the first private key to clipboard. For example, if the output is:
EthereumJS TestRPC v4.0.1 (ganache-core: 1.0.1)

Available Accounts
==================
(0) 0xe3ad859ced222ad3cb23e892f8baa4a3066ddf81
(1) 0x5f45c450b56295250a838a5dd12c465850a30a46

Private Keys
==================
(0) aa92482860c291b0fec730d9ceb64fd9e22c4380ddc09ae1c4e0969955a35d8c
(1) 8b419173ef63e7df7c58cd66ec891032cf13d748b3d9eb59b8bc019e3eacc094
Then copy private key (0) which is aa92482860c291b0fec730d9ceb64fd9e22c4380ddc09ae1c4e0969955a35d8c.
- Paste this private key to Metamask's "Import account" form. Add
Oxprefix for format compatibility. - Your Metamask extension is now logged in to the Ethereum network for this particular account. Next time, when you run testrpc, use the following command:
testrpc --account="0xaa92482860c291b0fec730d9ceb64fd9e22c4380ddc09ae1c4e0969955a35d8c, 1000000000000000000000"and the network will start with given account as the primary one, loaded with a lot of funds (ETH) for spending on gas. If you start only with the
testrpccommand then the network randomly generates new accounts each time.
Now calltruffle deployto compile and push your contract to the test blockchain. You can now start the frontend app locally usingnpm startand your webapp will be hosted onlocalhost:8080. Voila! You can use the app. I recommend switching to different ETH accounts in Metamask to see more than 1 vote being registered.
live
Deploying to the main Ethereum network requires real connection instead of testrpc. For example, you can run geth to log in to your real account, and then again call truffle deploy. Then, in Metamask, switch to proper network and account.
Summary
Writing a dapp was a very exciting experience. First of all, the tooling ecosystem seems to be impressively rich and stable. We can see frequent new version releases of truffle, testrpc, Solidity and other technologies. Using modern frontend stack makes writing of the client part quite pleasant, allowing to design with components for very good maintainability and testability. However, there are also some difficulties and question marks:
- Gas prices seem to be pretty high
- Debugging smart contracts is difficult. Remix IDE helps a little bit, but still it's far from what we know from other technologies, especially that we cannot even write any kind of console output traces, and the error codes/messages don't tell too much
Smart contracts have a lot of potential. Some great improvements are on their way (for example sharding, which should address scalability issues). There's also a deep subject of tokens, which is rapidly gaining popularity. The crypto world is definitely an exciting technical field, well worth watching and especially experimenting with.
See full sources of the app on GitHub
Appendix - authorization cryptography
If you’d like to know more about all the cryptographic functions and blockchain features that we used to implement authorization, this appendix is for you.
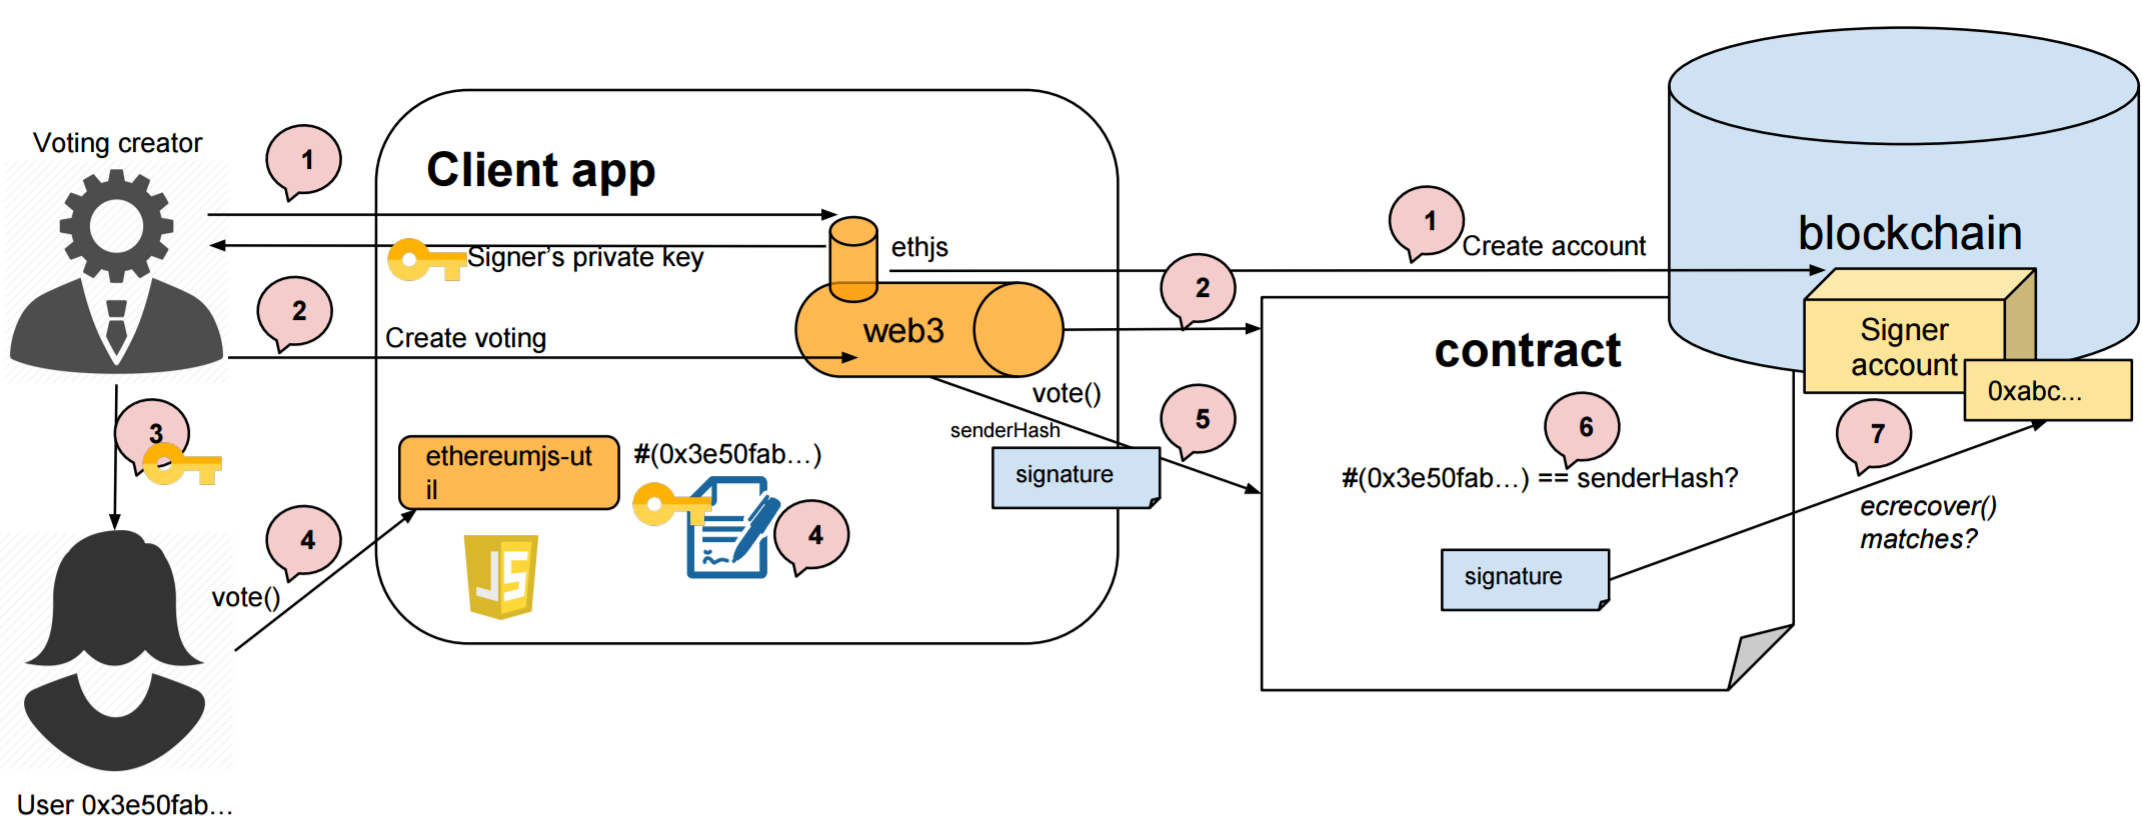
- Voting creator initializes a new voting. They create a new Ethereum account, which generates a private + public key pair. The public key is just the account’s address. This account will be now called signer account.
- Voting creator calls the contract to store a new voting on blockchain, associated with signer address.
- Voting creator distributes voting URL to a Voter, part of the URL is the signer’s private key.
- Voter prepares their vote. The signer's key is used to digitally sign the hash of their (voter’s) account address. Calling the
ecsign()function fromethereumjs-utillibrary generates a signature. - Voter sends their vote to the contract, together with the hash of their account number and signature of this hash (made using the signer private key).
- Contract calculates hash of the sender account number and compares the result to provided argument hash.
- Contract uses
ecrecover()- a function that takes a message and a signature and returns account number used to sign this message. This account number must mach the signer's account. - If both verification pass, the contract proceeds with voting.
These verifications ensure that:
- Only users who know signer’s private key can send votes.
- No one can impersonate authenticated user and change their vote.